Friday, July 8, 2011
2011 Crazy Eight Shop Hop
August 5, 6, and 7th marks the annual Crazy 8 Shop Hop! This is always a great time for all. Visit area shops Friday, Saturday and Sunday for a chance great prizes plus have a lot of fun. Each participant will receive a shopping bag with goodies at their first shop. Door prizes and refreshments along the way, plus prizes for the best poker hands in the end! Email me through the website at The Crazy Quilter website with any questions or for more info.
Tuesday, June 28, 2011
Snazzy New Bag for Bailey

Bailey picked out fabric for this great bag a few weeks ago, and while she was away at camp I surprised her by finishing it! Now it goes everywhere with her. It was surprisingly quick to make after the gathering of the strips was finished. It is the Snazzy Bag by Lila Tueller, made using Happy fabrics.
Friday, June 3, 2011
New Fun Projects
Last week I spent a few minutes here and there making some of the great new projects from Ellen Medlock. These are more of my favorites from Market, and they have been super fast, fun, and easy. My girls and I now have coordinating rings, bracelets, and purses for our dresses! Possibly the easiest and least expensive accessory ever is the button rings.

Then there's this fantastic heart clutch!

Great napkin rings! These come white, and you can paint them, cover them with ribbon, wrap them with fabric, or anything your imaginations can come up with! Make them to match your dishes, tablerunner, or whatever!

And finally, the bracelets. They are similar to the napkin rings, only bigger around to fit over your hand. They come in large or medium size (we all wear the large so medium is for small children and people with very small hands). I can't decide if I like the ribbon covered ones or the fabric ones better! They are like chocolates, you can't have just one!

Like what you see? Want to try it your self? You can find these items online under Gifts & Fun. Bracelets will be added soon!
Friday, May 27, 2011
Spring Dress Fever
Spring and Summer always bring on the mood for me to sew up a new dress or two. This year, I get to sew three! After finally finishing my Monique Dress Tuesday (pics soon), Bailey and Kylee both wanted a dress too. So, yesterday, at Kylee's request, I sewed up an Abigail Dress for Kylee that matched her hat and headband.

The only catch? She had her heart set on wearing the dress for the Spring Music Concert, this morning! I guess I do best when I'm under the gun, because I finished the dress at 5pm yesterday, and she skipped off to school in it at 8am this morning! Thank goodness it fit!

Now, I just have to finish another Monique Dress for Bailey by next weekend, and I'll probably be over my Spring Dress fever for a little while.
And, just for a little proof that even when I don't write on here, I am actually doing things, here is a picture of a delicious cake I made for Nick's 18th birthday Tuesday.

Here's how to make it:
Roll 1 package of sugar cookie dough out into a circle, using flour as needed. Place on a pizza pan and bake according to directions on dough. Allow extra baking time as necessary to make sure the center is done. Then cool.
Mix an 8oz. package of cream cheese with 1/2 C. of sugar and 1 tsp. of vanilla. Spread evenly on the cooled crust.
Slice up your favorite fruits (I used strawberries, kiwi, and blueberries) and decorate your cake with fruit and berries.
Eat and enjoy!
Tuesday, May 17, 2011
Back from Market
Another Quilt Market has come and gone, and I survived yet again. We had a fun trip to Salt Lake City, and found some great patterns. I have finished uploading everything to the website that is in stock now, and more will follow as ordered items start to arrive in about a week or so. Check out the New Additions category to keep up with everything we found!
I also ordered various fabrics that will ship through the rest of the year. Included are a western themed line, a large selection of black, white, cream, and brown prints, some wilderness cottons by Holly Taylor, and new Maywood florals.
Now that I am on summer break from school, I will be spending my spare time (or lack of spare time as the case may be) sewing up a storm of new store samples. First up, my Santa Monica jacket, which now has sleeves and will hopefully have a collar and a zipper by the end of tonight!
Thursday, May 5, 2011
Fun, Easy Headband Tutorial

I saw headbands similar to this style in a mail flyer, and wondered if I could make them easy and inexpensively. Mine are more funky and less fancy, but just as fantastic! I am not a pattern writer, so use these instructions at your own risk. If you are smart enough to follow them, you are probably smart enough to make up your own pattern, so make as many of these headbands as you want, just don't sell the pattern!
Here is how to make your own. (Pictures follow each step:
1. You will need 2 strips 2.5" wide by WOF for your headband, 1 strip 2.5" wide by WOF for your flower, enough fusible fleece for a 2.5" x 40" piece (can be pieced together), and a scrap of green for your leaves. You will also want matching thread.

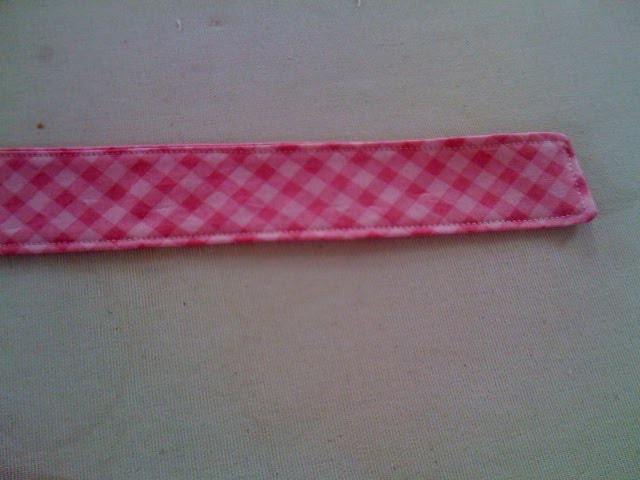
2. Layer your two main strips together, still folded in half, with the fold at the same end and lined up together. Using your ruler and rotary cutter, cut the long sides at a slightly tapered angle by lining the ruler up with the folded top corner and in about 1/4" from each bottom corner. Then, cut the selvages off straight across the end.


3. Using one of these angled strips as a pattern, cut single sided fusible interfacing to cover 1 strip. Since my fusible interfacing is 20" wide, I cut two pieces and butt them up in the center of the band before ironing. Because you will be ironing them on, plus sewing around them, you don't need to have the interfacing all in one piece.
4. Iron the fusible interfacing to the WRONG side of one ofyour headband strips.

5. Layer both headband strips, one with interfacing and one without, together with right sides facing. Sew around using a 1/4" seam allowance and leaving about 5" for turning on the center of one long side. Clip the corners at each end.

6. Turn the band right side out, one half at a time. Iron the band, making sure to press all seams out with no folds. Top stitch around the entire band, 1/8"-1/4" in.

7. Taper the 2.5" strip for the flower. This doesn't have to be very exact, just taper it to a slight point. You might also want to cut this strip down in length to about 30" for a less bulky flower.

8. Cut 2 or 3 leaves from your green scrap. I just eyeballed mine by cutting two intersecting arcs.


9. Take the flower strip and fold it accordian style. This may take some pratice to get it just like you want it, and you want your accordian to be messy. Once you're satisfied with it, sew it in the center to hold it.


10. Place your flower on your headband by trying it on and seeing exactly where you want it to be on your head. I like mine just to one side or the other. Once you like your placement, sew the flower to the band by just sewing a 1/2" line in the center and then backstitching. Then, add the leaves by sewing around them and then up the middle with a straight stitch.

Congratulations! Your headband is ready for wear! Tie and enjoy.
Thursday, April 21, 2011
Upcoming "I Sew, So I Hop" Shop Hop
The 7th Annual I Sew Shop Hop is fast approaching! Here are the dates, details, and fun:
May 6 & 7, 9am-7pm daily
9 Quilt Shops in North Idaho and Eastern Washington
Fantastic Prizes! Prizes are drawn at random from all completed passports. The Grand Prize includes a $25 shopping spree at each participating shop. There are tons of other great prizes. (I got to be the prize collector this year and they are making a mountain in my office!) Prizes include fat quarter packs, charm packs, books, patterns, rotary mat/cutter, a custom sewing machine table, and more!
Great fun, friends, and food, plus door prizes at many of the shops along the way.
All hoppers will receive a goody bag. In addition, all hoppers will get a free fat eighth and pattern at each store they visit.
Need a map, more info, or have questions about any of this? Feel free to email me at crazyforquilting1@yahoo.com! Grab your friends and carpool to fun!
Subscribe to:
Posts (Atom)


